How to Wire a Dryer
The first step in how to wire a dryer is to review your electrical configuration. Electric dryers typically require a dedicated 30-amp, 240-volt breaker. The wire supplying power from the breaker panel to your dryer outlet will usually be a 10/3 Romex cable (Blk wire- hot, Red wire - hot, White wire - neutral, Bare copper wire - ground).
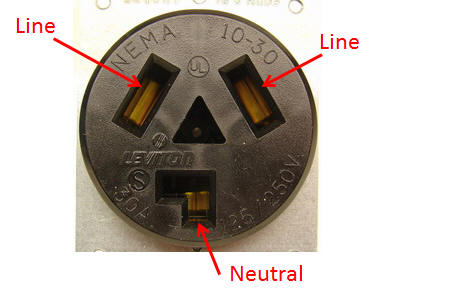
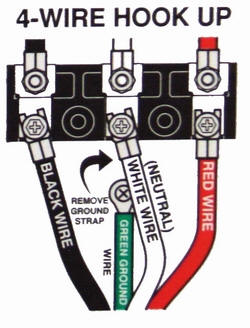
New dryers do not come with a power cord. That's because until recently, homes were wired with two different receptacle styles: 3-prong and 4-prong. Knowing that homes had a variety of outlet types, it didn't make sense for appliance manufactures to pre-wire the stove with one or the other. The 4-prong plug adds a safety ground wire in addition to the two hots and neutral found on the 3-prong plug. Below are pictures of both a 3-prong and 4-prong style outlets with respective labeling. With a voltmeter you can check for proper voltage on the wall outlet before plugging in your appliance. You should measure 220-240VAC between lines (hots), and half of that voltage if you measure between either of the hots to neutral. If you are wondering how to wire a dryer with a 4 prong plug but you have a 3 prong wall receptacle you have a couple of options. One is to upgrade the wall receptacle to a 4 prong receptacle. Hopefully there is a ground wire already to the electrical box...otherwise this option will not work. The second option is the leave the 3 prong wall receptacle as is and purchase a 3 prong cord for your new dryer. Most dryers will accommodate this configuration as they know a lot of people still have the 3 prong receptacles in their homes that they must make work.

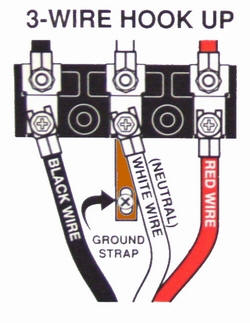
If wiring a newer dryer into an older home, containing a 3-wire outlet, you can do so with the diagram to the left. The dryer will need to have a copper grounding strap between neutral and the green grounding screw. The grounding screw will connect directly to the dryer chassis or frame. The hots (black and red) are connected as shown and the neutral wire gets tied to the center lug.
Instructions on How to wire a Dryer:
|
|
|