Doorbell Wiring and Installation
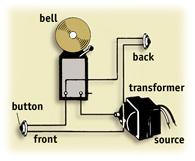
A typical residential doorbell system includes a transformer (to convert 120VAC to 24VAC), a bell/buzzer, and button for ringing the bell. Residential door bell wiring uses low voltage except the line side of the transformer. The line side of the transformer must be terminated in an approved electrical box, similar to a light switch or wall outlet. The transformer is used to step the voltage down from 120V to 16, 18 or 24 volts. One or two buttons for front and back door can be used to activate your doorbell system. Below is a standard doorbell wiring diagram. Since transformers come in a variety of voltages, be sure your transformer provides the correct voltage for your particular doorbell system. They often come together as a kit, but sometimes you buy them separately.
Doorbell Wiring Diagrams
If your bell/buzzer only seems to support a single button, as shown below, it is still possible to wire two or more buttons to the system. You merely connect both buttons to the same terminal. You can connect two, three, four, or more buttons in the fashion if you really wanted to.
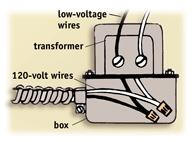
You can determine which side of the transformer is the line side, or 120V side, because it will usually have a black and white wires to connect to with wire nuts. The low-voltage side will usually have a couple of screw terminals to connect your 18 gauge bell wire to. See diagram below:
Doorbell "Bell" Wire
Doorbells are typically wired with 18 gauge wire, also referred to as "bell" wire. Terminals on the buzzer/bell are commonly labeled "F", "R", and "C". "C" stands for common and should be tied to one of screw terminals coming out of the transformer. "F" stands from front and is used for the front door bell. "R" stands for rear and is used for a rear door bell. Many doorbell systems use a different buzzer or bell tone for front and rear so you can tell which button is being pushed.
Troubleshooting Doorbell Wiring
The following tips can be used to troubleshoot a doorbell wiring problem. This is more common on doorbells of older homes that have suddenly stopped working but occasionally you'll find your new doorbell wiring is not working properly as well.
- Use a low-voltage circuit tester for testing the wiring
arrangements for doorbells, buzzers or chimes. This type of
tester is readily available at most hardware stores and home
centers for a very reasonable cost.
- When problems arise, the doorbell button is usually the
culprit. Always check the button first if a doorbell or chime
fails to function. Metal fatigue in the spring or corrosion from
the weather may cause the contact point to fail to function.
- After checking the bell button, inspect all visible sections
of the wiring for breakage or mechanical damage.
- Use a low-voltage tester on each section of the wiring. You
will probably locate a break in the wiring rather than a short.
- The bell will continuously ring–even when the button is not
pushed–if you have a short somewhere in the wire.
- If the transformer has an overload protection device, a
shortage may cause it to cut off the secondary current. So, the
transformer should also be checked when problems occur.
- To check the transformer, disconnect one wire from the
transformer's secondary screw. Touch the low-voltage terminal
and the disconnected wire with the low-voltage tester.
- The bulb will light if there is a short in the wire. Be sure
that the bulb you use in the low-voltage tester matches the
voltage in the transformer. If you are using a lower-voltage
bulb, it will burn out during testing. If you are using a bulb
with a high-voltage rating, the light will simply be dim.
- Use a low-voltage tester to test the doorbell button.
Connect the button from one transformer terminal through the
bulb tester and back to the other terminal. If the button is
working, the bulb will light when the button is pushed.
- If the trouble seems to be in the bell, buzzer or chime, the
problem is usually in the connections at the contact point.
Remove each connection wire, file it with sandpaper and replace
each wire.
- More expensive chimes have solenoids that may be very
difficult to replace. In some cases, these solenoids burn out
and the chimes will fail to function. You may need to return the
chime to the manufacturer for repair.
- When first installing a wireless unit, if the unit fails to
operate, try plugging in the sound unit closer to the location
of the pushbutton. You may just be out of the range of the small
transmitter in the pushbutton.
- With the wireless units a weak battery in the pushbutton may cause the unit not to work. Check the battery with a low-voltage tester set to DC volts. If the battery is weak, replace it.
Residential Electrical Guidelines and Codes
Rough-In Electrical and Pulling Cable
Common Electrical Wiring Diagrams
Wire Gauge and Voltage Drop Calculator
NEC Reference Tables (2011, 2008, 2005, 2002, and 1999)
Sizing Your Electrical Service
Electrical - Main Service Line Installation