Install Guide: Fiber Loose Fill Insulation
Introduction
Loose fill insulation is a viable alternative to batts and rolls in difficult access areas such as truss attics or closed wall cavities (retrofit). It is also widely used in conventional attics as a matter of builder or homeowner preference. The installation process for loose fill insulation is more complex than for batts or rolls because a blowing machine is required for installing loose fill. This dictates that workers be carefully trained to install loose fill products in strict accordance with manufacturer coverage charts.
Installation - General
Blown fiber glass insulation generally can be installed in all ceiling and sidewall areas as well as in other exposed areas such as overhanging floors. Loose fill is properly specified by R-value, not inches of thickness. The “R’’ stands for resistance to the flow of heat and is a measure of how effective the installed insulation will be. The higher the R-value the greater the insulating power. Ask your seller for the fact sheet on R-values. It is important that the R-value being considered is the value for the total amount of insulation used. R-value per inch can be misleading because the amount and the thickness required may vary with products of different manufacturers. In order to achieve the specified R-value, loose fill must be installed so that at least the minimum thickness and weight per square foot are achieved. The only practical way to do that is to be sure to install at least the minimum number of bags per 1000 square feet as specified on the label coverage chart. ASTM Standard Specification C 764 requires a coverage chart, a sample of which follows. On an actual label, the coverage chart will show numbers representing specifications for the particular manufacturer’s product. Refer to the label specification on a bag that you use.

The number of bags per 1,000 sq. ft. is based upon net area, which is the total area minus the area covered by framing members and other obstructions, while job size is usually figured as total (or gross) area. Because the net area will always be smaller than the gross, the number of bags per 1,000 sq. ft. of gross area may be reduced slightly, generally 3 to 8 percent, from the number on the label. Manufacturers may provide correction factors or tables to make this adjustment. However, the bag label makes no allowance for the additional material that might be needed where blowing is difficult, such as under flooring or at obstructions where the insulation may pack.
Consumer Information: FTC Home Insulation Rule
The United States Federal Trade Commission’s Labeling and Advertising of Home Insulation Rule requires installers to provide each customer (builder or consumer) with a signed and dated contract or receipt for the insulation installed. The receipt for loose-fill must show the type of insulation, coverage area, thickness, R-value and number of bags installed. The manufacturer must also provide a manufacturer’s fact sheet. The fact sheet for loose-fill insulation must contain, in addition to the manufacturer’s name, address and type of insulation, a chart containing the R-value and coverage information contained in the sample table above.
Installers must have this information and show it to customers before they agree to buy the insulation. A new-home seller must put the following information in every sales contract: the type, thickness, and R-value of the insulation that will be installed in each part of the house.
Clothing
When installing loose fill insulations you should:
■ Wear a long sleeved shirt loose at the neck and wrists, long pants, gloves and cap.
■ Wear eye protection (safety goggles, safety glasses or a face shield or a combination of these, as appropriate).
■ Use a NIOSH/MSHA approved disposable dust respirator, such as a 3M model #8710 or #9900 or equivalent.
Equipment
In addition to the usual tools needed to operate equipment and prepare the installation site, carry an extension light with long cord, extra bulbs, a step ladder and a flashlight for use in dark attics and closed-in areas.
Ceiling Installation Guidelines
Preparation
Lighting
Be sure there is sufficient light by which to work. Every crew should carry a long extension cord with extra bulbs to use whenever the attic is not sufficiently lighted. The hoseman should also have a flashlight.
Clear Attic Area
Before starting to insulate in the attic, anything which might interfere with the movement of the hoseman or the proper application of the insulation should be removed or placed in an area where it will give the least amount of trouble. Items stored in the attic should be protected as much as possible. Clothes and other items which could be affected by the insulation must be removed from the attic.
Special Attention
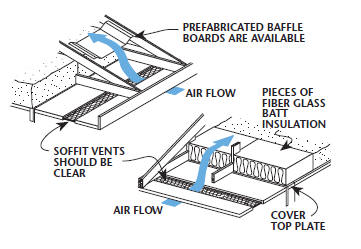
■ Be sure that eave vents are not blocked. Ways to shield these openings are shown in figure below.
■ Small openings should be hand packed with fiber glass insulation.
■ Cavities, drops, and scuttles should be covered with insulation or their sides and bottoms should be insulated. Drops can be floored with gypsum board or other suitable material so that insulation can be properly applied.
■ Recessed lighting fixtures and fan motors protruding into the ceiling must not be covered with insulation and insulation should be held three inches away from their sides, in accordance with recommendations of the National Electric Code. The purpose is to prevent overheating of fixtures. Prior to installation, these areas can be isolated or blocked by using pieces of fiber glass batts (3 inches away) or prefabricated barriers. (This warning does not apply to Type IC fixtures or fluorescent fixtures with thermally protected ballasts.)
■ It may be necessary to install batts over suspended acoustical ceilings and other similar “special’’ areas.
Installation
When installing loose fill insulation it is recommended:
■ To achieve the desired R-value, you must install at least the number of bags required by the label to at least the minimum thickness required by the bag label. To ensure the minimum insulation thickness, the International Energy Conservation Code (IECC) requires that rulers be attached in each 300 sq. ft. area of the attic to use as gauges during installation.
■ Make sure the machine is set in accordance with instructions on the bag. (Settings may vary depending on the machine condition, climatic factors and application techniques.) The machine settings were developed by manufacturers using machines in good working order and application techniques considered to be acceptable in normal field operation. It may be necessary to make some adjustments to these initial settings to fine tune the performance of the equipment.
■ When blowing, keep the hose level, and install with a minimum of hand deflection. Always blow with, not across, the joists.
■ Section the attic into quarters and make sure one-quarter of the specified number of bags is used in each section to achieve the desired R-value.
Application
Unfloored Attics
■ Keep the hose parallel to the floor, with the insulation falling 10 to 12 feet in front. Where possible, back away from work to prevent packing.
■ Where work space is tight, prevent the insulation from packing by allowing it to blow off your hand.
■ Blow three or four joist spaces from one position by moving the hose to the right or the left. Always blow in the direction of joists, not across them.
■ Keep the hose close to the floor where insulation must go underneath obstructions such as cross-bracing and wiring. Insulation must be blown on both sides of this kind of obstruction.
■ Where an obstruction may cause a low spot to occur, move around, check this spot and, if necessary, fill in the low area.
■ Be sure that insulation is installed on both sides of obstructions such as solid crossbracing and masonry chimneys.
■ If a batt or baffle is not used to block off the ends of joists, be sure that insulation is applied all the way to the outer edge of the plate.
■ When roof construction does not allow full depth to the ends of the joists, bounce the insulation off the underside of the roof to increase density in that area. Care should be taken not to block the eave vents. (see figure above.)
■ To prevent overheating of recessed light fixtures, do not insulate on top of or within three inches of such devices. To be in accordance with the current National Electric Code, provide a way of holding the insulation away by making a shield of noncombustible material. For local requirements, contact your local building department. (This warning does not apply to Type IC fixtures or fluorescent fixtures with thermally protected ballasts.)
■ Use only unfaced fiber glass insulation between wood framing and masonry chimneys. Do not place insulation in air spaces surrounding metal chimneys or fireplaces.
■ Clearances around fossil fuel appliances should meet the requirements of the National Fire Protection Association (NFPA) or appliance manufacturer’s recommendations.
■ Water pipes run in the attic area must be given protection since the attic temperature during cold weather will now be very close to that of the outdoors. The severity of the winters and the location of the pipes will determine what is required to prevent freezing.
■ After the attic is blown, even out any high or low spots.
■ Do not remove the hose from the attic until the foreman has inspected and determined that no areas have been accidentally missed and that the correct number of bags has been installed.
■ Install a piece of batt insulation on top of areas where loose fill has not been applied, such as access panels, stair wells, and fan covers. The completed job should provide a continuous layer of insulation over the entire ceiling area.
Floored Attics
■ Many attic areas contain some floored areas, which present no real problem. It is not advisable to attempt to blow more than 4 to 6 feet under flooring, so floor boards should be removed approximately every 8 to 12 feet.
■ Some flooring is difficult to remove because of its nailing pattern. When that is the case, take care during removal to prevent damage to the ceiling surface below.
■ Since it is difficult to see bracing underneath the flooring, take particular care to ensure that the flow of insulation under the floor is not being blocked. When there is a large amount of bracing or wiring under the floor, it may be necessary to take off several boards in a small area.
■ Insert the hose approximately 4 to 6 feet under the floor and gradually pull it out as the space fills with insulation. Twist and turn the hose as it is removed in order to ensure complete coverage of the area under the floor.
Attic Knee Walls and Slopes
■ Some houses contain finished attics. This type of construction can have both knee walls and flat and sloped ceilings. Although it is possible to use retainers and blow knee walls, it is easier to use batts. (see figure below)

Attic Stairways, Scuttles, and Pull-Down Stairs
■ Many older homes have attic stairways. A ceiling insulation job is not complete until the stairway is insulated, including the soffit area, the walls, and the door.
■ Many times the soffit area can be filled with insulation by either removing the treads or drilling holes and filling with insulation. Close holes by means of plugs. Plugs can be finished and restained or painted as necessary.
■ Stairway walls can be insulated in the same manner as any other wall. Finish the openings as required to match the existing stairway finish.
■ An alternate to insulating the entire stairway assembly is to install a trap door, operated by a counter-balance, over the top of the stairway and insulate it with batt insulation.
■ Scuttles and pull-down stairs should be insulated. Insulation can be attached directly to the scuttle hatch. Insulated boxes are available for insulated pull-down stairs.
Recommendations for homeowners hiring an insulation contractor
If you prefer to hire an insulation contractor, you can find one by:
■ Asking your utility company for suggestions.
■ Consulting friends and neighbors.
■ Looking in the phone book “Yellow Pages’’ under “Insulation Contractors-Cold & Heat’’ or a similar heading. Remember that a contractor has the special skills needed to insulate sidewalls as well as to do an expert job of insulating ceilings and floors.
The next step is to call in two or three contractors to quote your job. You should judge a contractor’s reliability as well as his price. Here are some suggestions:
■ Check a contractor with the local Better Business Bureau (also listed in the phone book). Or ask your bank to get a report on his credit rating.
■ Ask a contractor for references, including other homeowners for whom he has done work. Check them out.
■ Give all the contractors exactly the same description of what you want done. For example, say, “I want to add R-19 to my attic floor,’’ then stay with that specification and that way of saying it. Don’t be satisfied if a contractor says, “Okay, I’ll add 6 inches.’’ Not all brands of insulation have the same R-value per inch. Six inches of one brand might not have the same R-value as 6 inches of another. Stick with Rvalues. If a contractor won’t deal with you in R-value language don’t you deal with him.
■ If a contractor is going to blow insulation in your attic, how can you tell if you’re getting the R-value you’ve requested? First of all, make sure the written contract states R-value, the minimum thickness and the number of bags of insulation to be used to achieve the R-value. In addition, you can check the bag label yourself.
■ Ask a contractor how he pays his installers, by the number of square feet they install or by the hour. If he pays them by square footage, they might do a hasty job on your house just so they can get on to the next one.
■ Ask a contractor about the insurance he carries. Does he have insurance to protect his own men if they are injured? Are you covered if one of his men damages your house?
Building Insulation - Performance Comparison
Places to add Insulation for $ Savings and comfort
25 Checkpoints for Inspecting Insulation Jobs