Nail Size Chart
The following guide and nail size chart will help you in selecting the proper nail sizes for your framing project. The first thing to note is the the letter "d" on the nail size denotes "penny". For example 16d stands for 16 penny nail.
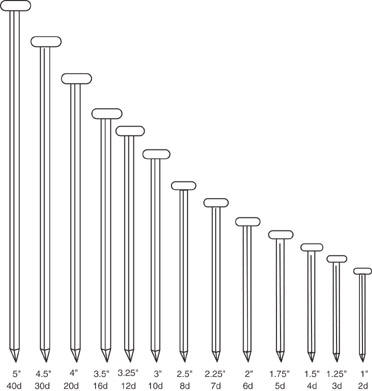
Nail Measurement Guide: 2d to 16d
A 2d nail is 1 inch long and a 3d nail is 1.25 inches long. 4d nails measure 1.5 inches and 5d nails measure 1.75. A 6d nail is 2 inches long and an 8d nail is 2.5 inches long. 12d nails are 3.25 inches long and 16d nails (16 penny) are 3.5 inches long. The nail size chart below shows how they stack up against each other.
Nails to use for Framing
8 and 16d coated sinkers provide 95% of your needs in framing. Most framers prefer to use 16d nails for framing 2x lumber including walls. If you walk in to Home Depot you might see boxes of nails labeled "16d common", "16d sinker", or "16d short". Here's the difference:
16d common = 3-1/2" x 0.162" diameter
16d sinker = 3-1/4" x 0.148" diameter
16d short = 3=1/4" x 0.131" diameter
Shorts are not recommended for most framing applications are they have less than 70% of the capacity of the other two 16d nails. You should refer to your house plans which normally specify the type of nails to use.
Sinkers and Commons are close in physical size however sinkers have a waffle pattern on the top of the head to help drive the nails by providing a non skid surface for the hammer face and come in a number of coating styles. Sinkers are available with vinyl, epoxy and cement coatings. They are also available with a galvanized coating for locations that may be exposed to water. These coatings improve the holding power of the nails significantly. They also make you swear a lot when pulling boards apart when using these nails.
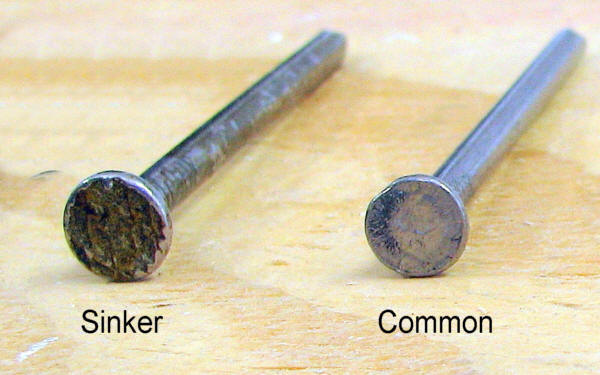
Commons have no waffling or coating generally. They should not be used in high moisture or exposed area as they will rust. Box nails are the same length as their sinker and common sisters, but have thinner shafts. Box nails are a holdover from when boxes were made from wood and the materials were thinner,(think fruit crates) and a thinner shaft minimized splitting of the slats when nailing. Another type of nail worth mentioning is the duplex head nail. The duplex nail has two heads to make removable easier as it is used for applications that are temporary in nature. Most notably concrete forms and temporary scaffolding. Also known as scaffolding nails, from a time when scaffolding was made from wood, before the invention of steel tubular scaffolding. Now that you probably know way too much about nails…..
Common Nailing schedules for Floors, Exterior walls, and Roofs
First and foremost, plywood manufacturers recommend spacing 4x8 sheets of plywood by 1/8" to account for expansion and to prevent "puckering" of the plywood. This is common on roofs where the "puckering" effect creates noticeable humps and bumps in the roof. An easy way to create the 1/8" gaps is to use a couple 16d nails for spacers. Another tip, never countersink nails in OSB or plywood sheeting when you are installing it.
Floor: Floors are typically sheathed with 3/4" OSB T&G sheeting. Recommended nailing schedule is 8d ring-shank nails, 6in o.c. around perimeter of building and edges where sheets meet. 12in o.c. in middle of the sheets.
Wall: Exterior walls are typically sheathed with 1/2" exterior grade OSB. The nailing schedule for sheathed walls often requires 8d nails at 4-6-12. This means that nails are spaced 4 in. around the perimeter of walls, 6 in. at the joints between sheets, and 12 in. in the field. Check with your building department for required nailing schedules in your area.
Roof: Roofs are typically sheathed with 5/8" exterior grade OSB. Nail the sheets with 8d nails at 6 in. o.c. at the edges and 12 in. o.c. in the field. Before you start the second row of sheathing put H-clips, centered between the rafter chords, on the first row. These make the roof's surface stronger.
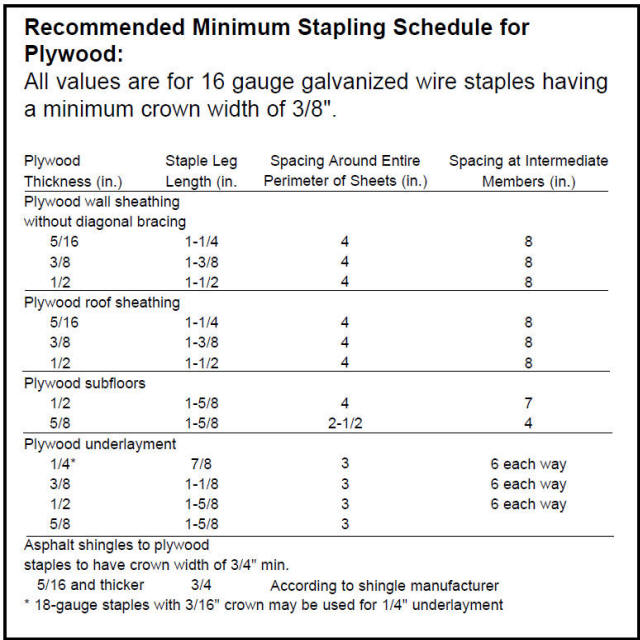
Stapling Schedules for Floors, Exterior walls, and Roofs
The follow chart shows recommended minimum stapling schedule for plywood. Check your building codes to see that staples are allowed.
Framing Second Floor (Rough Cut Beams/Floor)