How to Build Shower Floor 2 (Liner, Drain)
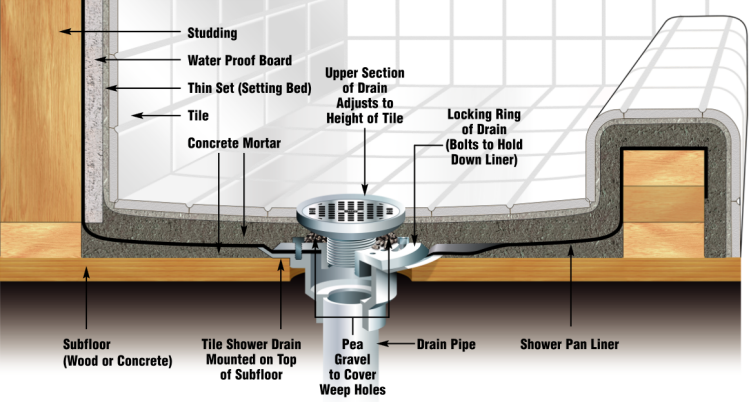
Now that the curb and pre-slope layer of deck mud is complete you are ready to install the shower pan liner. Notice the liner in the diagram below goes up the walls and over the curb. The PVC shower pan liner is a flexible waterproofing membrane that can be purchased at Lowes or Home Depot. You should purchase a liner large enough to extend at least 6" up each wall and extend over the curb as shown in the diagram below. If you must seam the PVC liner due to the size/shape of your shower or are installing dam corners, make sure you use the shower pan liner cement specifically formulated for the liner you are using. Oatley PVC liners have an Oatley X-15 PVC shower pan liner adhesive made for this. CPE shower pan liners require CPE adhesive. They aren't interchangeable so don't make the expensive mistake of using the wrong adhesive. If at all possible use a single liner with no glued seems and then you won't have to worry about this.
Installing Shower Pan Liner

Vacuum or sweep out your pre-slope floor. It will be sandy which is OK. Just make sure there are no sharp objects that could puncture the liner. Remove the top flange of the drain if it is still installed and thread the 4 bolts into the bottom flange. Position the liner in the shower pan over your preslope floor and up the walls. Once in position, carefully take a utility knife and cut X's on the heads of each of the 4 bolts and slide the liner over the bolts. Now feel for the center of the drain and carefully cut an X in the center and then cut open the drain hole just large enough to expose the drain. A 2" diameter hole is all you want to cut out. Next pull the liner back off the drain and put a 1/4" to 3/8" bead of 100% silicone caulk around the upper surface of the drain base about 1" in from the outside edge. Put the liner back over the drain and press the liner into the silicone. Attach the drain clamping ring tighten the bolts firmly to secure the liner to the drain. The liner should be run up the walls of the shower pan and corners should be folded as shown above and nailed or screwed along the top 1" of the liner to hold the liner in place. Do not cut the liner down to the floor in the corners to make it fit better and do not put nails or screws through the liner except for along the top 1" and the outside edge of the curb. Where the liner meets the curb, use a series of folds if possible to avoid cutting the liner. Some folks prefer to make a cut on the corner of the curb and install PVC corner dams. That works as well, just use the correct materials and adhesives.

Form some metal lathe over the shower pan curb. Be careful with the sharp edges of the mesh so that it doesn't puncture the liner. Screw or staple the lathe only along the outside edge of the curb. Do not staple to the top or inside wall of the curb. Screw the shower drain in to the drain pipe to the desired height of the top mud bed which should be 1 to 1.5" at the drain. This will allow your 2x4 screed to rest on the drain as you level the top mud bed. When that's complete the drain can be unscrewed another 3/8" or so to be flush with the floor tile. Mark a line with a sharpie 1 to 1.5" inches high around the perimeter of the shower matching the thickness you set at the drain. This line around the perimeter should be level so that the wall tile starts on a level line all the way around the shower. Put pea gravel or small rubber tile spacers around the weep holes of the drain as shown in the first image on this page.
Leak Test
Now that your liner is installed, most building inspectors require you to perform a leak test. You can purchase a 2" ABS test ball plug at Lowes or HD. This gets inserted into the drain below the weep holes in the drain to perform the test. Fill the shower pan with water to a level just below the top of the curb. Let is stand for 24hrs and see that the water has not leaked out.
Top Mud Bed
Now that we've made sure the shower pan is water tight it's time to install the top layer of deck mud which will support the tile floor. The top mud bed will be 1" to 1.5" thick and be uniform in thickness because the pre-slope floor already has the 1/4" per foot slope.
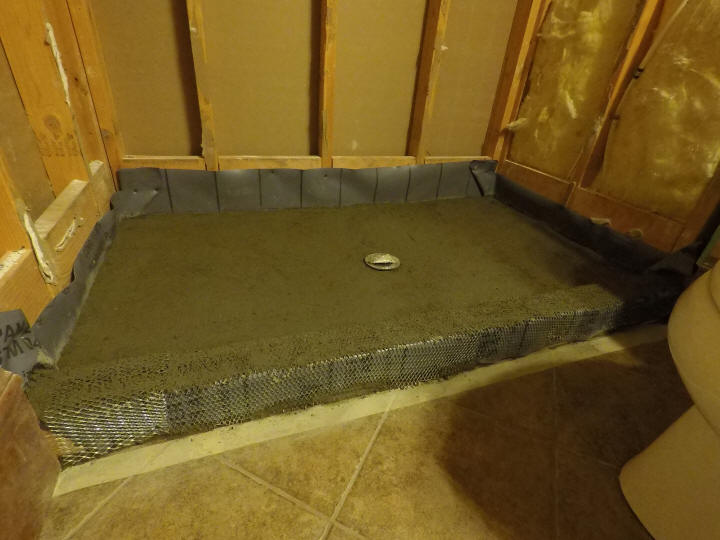
The photo above shows the top layer of deck mud installed over the shower pan liner. Pack that deck mud in as hard as you can. Make sure the mud deck is as smooth and flat as possible from wall to drain for the tile (flat does not mean level in this case - the floor obviously slopes to the drain). You can coat the curb with deck mud as well but using a layer of thinset instead is easier and won't crumble like a thin layer of deck mud over the curb can do.
That's it, let the top mud bed of the shower dry for at least 24 hrs.
Step 2: How to Replace a Shower Drain
Step 3: How to Make Shower Deck Mud
Step 4: How to Build a Shower Floor 1 (Curb and Pre-slope)
Step 5: How to Build a Shower Floor 2 (Liner, Drain, Final Slope)
Step 6: How to Install Shower Backerboard
Step 7: How to Build a Waterproof Shower Bench
Step 8: How to Tile Shower Floor
Step 9: How to Tile and Grout Shower Walls