Rough-In Electrical
In a new home, addition or major remodeling project, electrical wiring and boxes are "roughed-in" before the walls and insulated and drywalled.
Rough-In Electrical Boxes
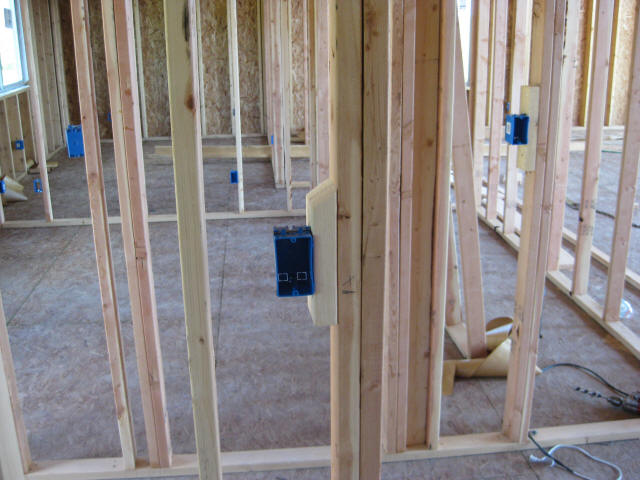
-Make sure wall switches are located with proper respect to door swing, and wall outlets will not conflict with tile, cabinents, casework, or baseboard heating.
-Each box should stick out a little past the framing so its front will be flush with, or set back just a fraction, the drywall. Be sure to account for any additional wall treatments like backsplashes or wainscoting.
-You can use a scrap piece of drywall to set boxes the right distance. Many boxes will actually have a pre-formed 1/2" reference line for quick installation.
-Receptacles are commonly mounted 16" high from floor to center of electrical box. Some folks prefer 12" heights rather than 16".
-Mounting heights for light switches are typically 42" to 48" from floor to center of electrical box.
-Countertop receptacle heights are usually 6" above countertops
-Receptacle heights are a matter of personal taste and practice
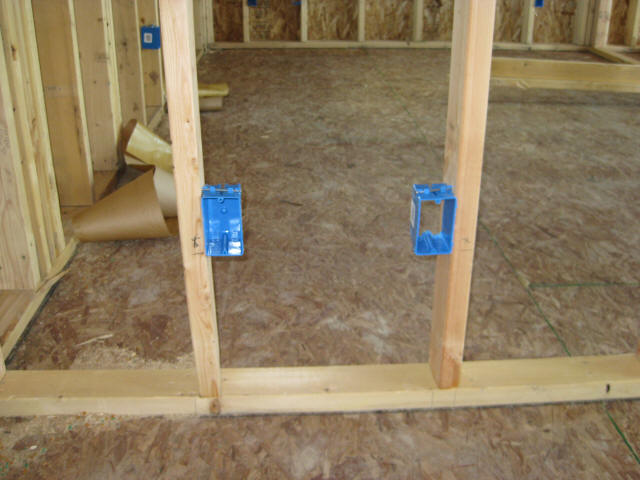
-Be sure to account for trim around the doors when you rough-in electrical boxes if you plan to put a light switch just inside the door such as in a bathroom. You can easily nail an extra piece of 2x4 to pick up a few more inches as shown below.
For roughing in Low-voltage receptacles (i.e. Ethernet or Coax) you can buy boxes that are orange and specified as low-voltage. Codes are a lot more relaxed on the low-voltage wiring. We ended up cutting the backs off some normal electrical boxes with a chopsaw to use for our low-voltage boxes. You can see an example below. Make sure your inspector is OK with this approach before you rough-in all your low-voltage electrical this way. I have heard of inspectors failing a job for not using a different color box for low-voltage.
Drilling Holes to Run Wire
Part of electrical rough-in is running all your electrical cabling, usually romex. To run cables you first need to drill holes in your walls to run the wire.
-Drill or notch the framing to allow for the cable/wiring to run between boxes, down into the under-floor crawl spaces, up into the ceiling, as as through studs. (most rooms have either an attic above or a basement/crawlspace below). Drill holes so cable runs horizontally through joists.
-A heavy-duty right-angle drill with a 1" bit is the tool for this job. Wall holes drilled at about knee-height will be just about right for outlets. Holes through ceiling joists and wall plates will be a bit harder so the right-angle drill is nice
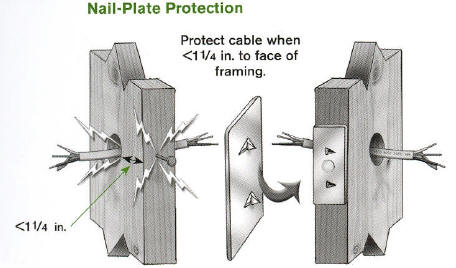
-Use metal reinforcing plates (nailing plates) at all points where the drilled hole is less than 1 1/4" from either outside edge of a study or joist. Nailing plates are required over all notches.
Guidelines for Running Cable
Electrical cabling must be roughed in and supported properly. It must be protected from physical damage and from electrical damage. Pulling cable is often much more efficient with two people: one feeding cable and one pulling.
-Bends in Romex must not be made too sharply. Bending cable incorrectly can weaken the outer sheathing as well as the insulation on the individual conductors. The radius of the curve of the inner edge of any bend must not be less than five times the diameter of the cable. A correct installation will result in a "jug handle."
-Cable must be fastened to the framing every 4-1/2ft, using staples, cable ties, straps, hangers, or similar fittings
-Flat cable (i.e. 14/2 Romex or 12/2 Romex) must not be stapled on edge
-Flat cables may be installed on top of one another and fastened with one staple, so long as one flat side of one cable is against the framing member and the other flat side is against the flat side of the next cable. (Two cables should not be placed side-by-side and fastened with one staple; this can damage the cable insulation.)
-Check that staples or fasteners do not cut through a cable's insulation
-Cables cannot run closer than 1-1/4" to the nearest edge of the framing member (See nailing plates above)
-Opening around penetrations through walls, floors, and ceilings must be filled with an approved fire-stopping material.
-Cabling must be secured within 12" of where cable enters a box
-Cabling for recessed lights should be fastened to the nearest framing, providing a jug handle.
-All cables that run into metal or plastic boxes must be protected from abrasion. This can be accomplished by using connectors that have smooth openings for the cabling to go through or by simply making sure a short section of the cable sheathing extends past the clamping mechanism of a cable clamp.
-All cables that run into metal or plastic boxes must be secured to the boxes. This is typically done using internal or external clamps.
-Account for voltage drop that can be caused by long runs of cable. Try to limit drop to less than 3%. See voltage drop calculator here.
-Separate runs of cable are required for bedroom outlets (so they can be provided with Arc-fault Circuit Interrupter (AFCI) protection. The same is true for any other circuits requiring AFCI or GFCI breakers.
-As you rough-in your electrical and reach each box or service panel with your cable, pull a few extra feet of cable through for making connections later.
-Label each cable at the panel end with a marker or tape to keep them organized.
Residential Electrical Guidelines and Codes
Rough-In Electrical and Pulling Cable
Common Electrical Wiring Diagrams
Wire Gauge and Voltage Drop Calculator
NEC Reference Tables (2011, 2008, 2005, 2002, and 1999)
Sizing Your Electrical Service